Sunday, July 26, 2009

Baked Stuffed Cod


Tonight we had baked stuffed cod. It's a tried and true, and we all love it. This delicate, mild fish needs a boost of flavor, and this recipe always delivers.

This recipe uses very little butter and oil. If you're trying to achieve the type of dish you would get at a restaurant, you may want to add more butter or oil. As an alternative, I use a splash of chicken broth to make the topping moist. You could probably try using a little clam juice if you have that in your cabinet.

Baked Stuffed Cod


1-1/3 pounds cod

1/2 cup fresh bread crumbs

1/2 cup crushed Ritz cracker crumbs

1 T. olive oil

1 T. butter

1 t. lemon juice

splash of white wine

splash of chicken broth

1 large (or 2 small) garlic cloves

In a saute pan, warm olive oil and butter over medium low heat. Add garlic, and saute until soft (a couple of minutes). Do not let the garlic brown. Add the bread crumbs and Ritz cracker crumbs and continue to brown for a few minutes. Add the lemon juice, wine and broth. Continue to cook at a medium heat for five to ten minutes more. The mixture should be somewhat moist. If it's not, you can add a bit more chicken broth.

Cut the cod into four serving pieces. Spray a baking pan with cooking spray. Place the pieces of fish in the pan, and cover each piece with some of the bread crumb mixture.

Bake uncovered in a preheated oven at 400 degrees. It should take about 20 to 25 minutes for it to cook through. You'll know it's done when it can flake easily with a fork.

Friday, July 17, 2009

Roasted Beets and Sauteed Beet Greens

roasted beets and sauteed beet greens

roasted beets and sauteed beet greens At the farmer's market today, I was moved to buy beets. They looked too pretty and fresh to ignore.

I have only eaten sliced beets from the can, usually cold, usually in a three bean salad with red wine vinegar. When I went to college, I ate canned beets on my cottage cheese and lettuce during my I'm-a-vegetarian phase. Nowadays, I rarely have a can of beets in my cabinet.
Now I'm older (much), and I realize I've been missing something by not buying fresh beets. When I saw the price tag, just $1.79, I said "Why not?" I'm glad I tried them. They are tender, delicious, and nothing like what you get in a can.

I must come clean and admit that not everyone in my family will try these. My daughter had a bite of the beet and she liked it. That's about all I'm going to get out of the whole family. Nonetheless, I will continue to expose them to all kinds of foods so that one day they may like more foods.

I read a book in April, "Anticancer, the New Way of Life" by David Servan-Schreiber which described the many health benefits of beets. Among them, beets protect against heart disease, birth defects and certain cancers.

Although the oven made my kitchen so hot (today of all days, I decide to make these), it was well worth it. It really is a simple process to cook fresh beets. Just peel after they are cooked! You mustn't let the beet greens go to waste either. I liked them just as well as the beets themselves. Two side dishes in one!

Roasted Beets

Cut off the greens from one bunch of beets. Wash well. Put the beets in a dish coated with cooking spray. Drizzle a tablespoon of olive oil. Cover with foil, and bake in a 350 oven for about 1 hour, 10 minutes or until they are cooked to your liking. You'll know they are done when a knife can be inserted easily. I like the beets to be fairly tender. After they come out of the oven, let them cool. Peel. Slice thinly. Serve simply with butter, salt and pepper, or drizzle some red wine vinegar.

Sauteed Beet Greens

Wash greens very well. Cut into three to four inch pieces. In a large saute pan, warm a tablespoon or two of olive oil. Add a clove or two of garlic, depending on your taste. Saute the greens on medium heat until they are wilted. Season with salt and pepper. Sprinkle a little sugar (about 1 teaspoon) and sprinkle in some red wine vinegar (about 1 tablespoon).

Wednesday, July 15, 2009

Red Velvet Cake with Cream Cheese Frosting

red velvet cake with cream cheese frosting Take a look at the gorgeous color of this cake! My friend made me this Red Velvet cake for my birthday as a surprise. It was her first time making the cake, and it turned out so well.

I asked my friend to share the recipe. It comes from a man who calls himself the Cake Man Raven who owns a bakery/catering facility in Brooklyn, NY. He has a long list of celebrity clients who include Janet Jackson and Oprah. Here's his website: http://www.cakemanraven.com/index.htm

The key to this recipe could be the use of buttermilk. If you don't have any buttermilk on hand, there is an easy substitution using what you may have on hand in your refrigerator. For every cup of buttermilk you need, put 1 tablespoon of fresh lemon juice in a measuring cup and pour milk up to the one cup mark. Let the liquid sit for a minute before you use it.

The frosting is delicious! Butter and cream cheese - how could you go wrong? It is decadent and worth every calorie.

The fact that my friend took the time to make this cake for me means so much. But get this! She owns only ONE cake pan, and this is a three-layer cake. She put each of the three layers in the oven, one at a time. That is patience. Now that is a birthday gift. That is a friend.

Perhaps you'll be inspired to make this cake. Better yet, make it for someone you know. I don't think there is any better gift that money could buy.

Dry Ingredients:
2 1/2 cups of cake flour
1 1/2 cups of sugar
1 t. baking soda
1 t. salt
1 t. cocoa powder

Wet Ingredients:
1 cup of buttermilk
2 eggs
1 t. white vinegar
1 1/2 cups vegetable oil
1 oz. of red food coloring
1 t. vanilla

Frosting:
4 cups of powdered sugar
1 lb. of cream cheese at room temperature
1 lb. of butter, softened
2 t. vanilla

Combine dry ingredients in one bowl. In a second bowl, combine liquid ingredients and beat with an electric mixer on medium speed until well incorporated. Slowly add dry ingredients to that. Pour into three 9-inch layer pans that have been greased and floured. Bake at 350 degrees for 20 to 30 minutes. For frosting, mix together the cream cheese and the butter. Gradually add powdered sugar until it reaches desired sweetness and smoothness. Add vanilla and frost the cake!

Friday, July 10, 2009

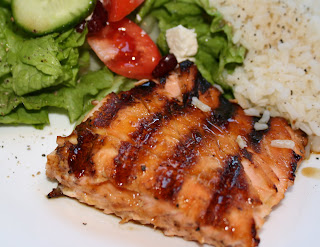
Sweet and Spicy Grilled Salmon

sweet and spicy grilled salmon
We all know salmon is good for us. It provides Omega-3 fatty acids and a lean source of protein. We should be eating more fish, and this recipe provides an easy, tasty way to get it done.

Unfortunately, however, there are some people out there who claim to dislike salmon. I'm not sure why they feel this way, but I bet every so-called salmon hater was tortured with salmon that was creamed or overcooked as a kid.

Give this recipe a try. It is slightly sweet and has a mild taste. I've made many versions, changing the ingredients each time I make it, depending on my mood. Try adding fresh ginger, honey, red pepper flakes, garlic, or lime juice.
My family could not get enough of this tonight! When your two children, ages ten and thirteen, are fighting over the last piece, you know you've got a winner.

Sweet and Spicy Glazed Salmon
adapted from Epicurious
6 T. light brown sugar
8 teaspoons Dijon mustard
2 tablespoons soy sauce
2 teaspoons rice wine vinegar
1 1/2 pounds salmon fillets, cut into three pieces

Preheat grill to medium high. Combine brown sugar, mustard and soy sauce in a medium bowl. Transfer 2 tablespoons of this glaze to small bowl; mix in rice vinegar and set aside. Brush 1 side of salmon fillets generously with half of glaze in medium bowl. Place salmon fillets, glazed side down, onto grill. After about one minute, you should be able to peel off skin on side that is facing up. Cook until glaze is slightly charred, about 5 minutes. Brush top side of salmon with the rest of glaze from medium bowl. Turn salmon over and grill until second side is slightly charred and salmon is just opaque in center, about 5 minutes longer. Transfer salmon to plates. Drizzle reserved glaze in small bowl over salmon and serve.

Tuesday, July 7, 2009

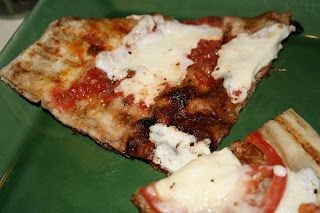
Grilled Pizza Margherita

grilled pizza margherita
Since we bought our new Weber grill (insert chorus of angels singing here), I am obsessed with grilling. I'm looking to grill anything that steps in front of me.

Last night, it was grilled pizza. It's hard to believe how much better a homemade pizza is when it is grilled. It's all about the crust, and our regular ovens do not get hot enough. Sure, I've used a pizza stone in my oven, and it was fine. But with a grill, you get a higher temperature which is great for making grill marks and a fabulous crust.

The crust of a grilled pizza is the best balance of crunchy and chewy. You've got to taste it to believe it. You may not ever feel the need to go to a "Brick Oven Pizza" place again. Use whatever you have on hand for toppings.

GRILLED PIZZA

1. First, start preheating your grill to high.

2. Get your toppings ready -- perhaps a little sauce, some cheese. I used fresh mozzarella and a store-bought bruschetta topping which I had strained. I also had some leftover sauteed mushrooms and slices of fresh tomato. Your toppings need to be somewhat dry so you don't end up with a soggy pizza.

3. Using thawed dough purchased in a bag at the grocery store (you can certainly make your own), cut the dough into two pieces. Stretch each piece into an oval. Place each oval on a baking sheet (for you to carry outside), and spread a tablespoon or two of olive oil on top of each. Bring the toppings for the pizza outside with you to the grill.

4. Place the dough oil side down on the grill. Shut the cover, and stand close by, because it cooks quickly. Once the crust is browned to your liking, flip the dough. Now it's time to start putting the toppings on that browned side of the pizza. Once you've put the toppings on, put the cover down and don't leave. Remove the pizza when the cheese has melted and the bottom is crispy.

Coney Island Sauce from Fall River

coney island sauce from fall river
At our recent party, I served boiled hot dogs with Coney Island sauce. There are so many different versions and recipes out there! I adapted this recipe that I received from a friend of mine.


I was very pleased with the results. One guest commented, "I can't get this in my mouth fast enough!"

Coney Island Hot Dog restaurants can be found all over the Fall River area. Each establishment seems to have their own take on the sauce. The hot dogs are small, so you must eat at least two. They seem to disappear in three bites.


"Dirty Nick's" in Fall River is considered the most famous of the hot dog places in this region. Now you can order their spice packets online so you can make their version of this delicious sauce.

http://nicksconeysauce.com/about_nicks/about_nicks.htm

I used Kayem skinless hot dogs (aka "Skinnies"), and served them in steamed buns. If you don't have ground chourice available to you, you could substitute another spicy sausage, or you could use two pounds of hamburger instead. Using the food processor is key to having the right consistency to the sauce.

1 Spanish onion (minced finely)
1-1/2 lbs ground hamburger
1/2 lb ground chourico
3 T Worcestershire sauce
2 T minced garlic
1/2 tsp black pepper
1 tsp crushed red pepper
2 T spicy mustard
1 small can tomato paste
1 8 oz. can tomato sauce
1 T celery salt (or to taste)

In slow cooker, place ground hamburger and chourico, and then cover meat with water and turn on high. Once meat is cooked (several hours), drain hot water and place half the cooked meat into the food processor and finely grind. Place meat back in the crock pot. In separate pan, saute chopped onion in olive oil until soft. Place onions in crock pot. Add the rest of the ingredients. Cook six to eight hours on low. You may want to adjust the spices.

Serve hot dogs with "the works" which means with sauce, yellow mustard, minced sweet onions, and a dash of celery salt.

Monday, July 6, 2009

Top Your Own Hamburgers

top your own hamburgers
We had our annual birthday bash for our son on the 4th of July. Putting our new grill to good use, we cooked quarter pound hamburgers. I bought a wide variety of hamburger buns. Then, our guests chose from a bunch of different toppings. Everyone seemed to enjoy customizing their burgers.
Topping Choices

I sauteed sliced Baby Bella Mushrooms in olive oil and garlic, and then I added some Montreal Seasoning and fresh thyme at the end.
Another topping choice was Balsamic Caramelized Vidalia Onions. I sauteed the large slices of onions in olive oil. After they had softened, I added chopped garlic, a teaspoon of sugar or so, some Montreal Seasoning, and a splash or two of balsamic vinegar. I turned up the heat and let everything get nice and caramelized.

Next, I baked some extra thick cut bacon. I cooked these extra thick slices in the oven at 400 degrees on baking sheets covered in aluminum foil. Regular bacon takes about 20 minutes to cook this way. This bacon took about 30 minutes. It was a big hit! Both young and old cannot resist a slice or two of bacon.

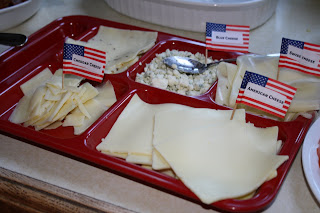
I also provided an assortment of cheeses, including: American, Swiss, Cheddar, Blue, and Pepperjack.
For dessert, I served Cheesecake Bites purchased at Sam's Club, GB's favorite. But I also offered thick brownies which were made into sundaes.

I highly recommend you hold your own Top Your Own Burger party this summer -- a new twist on an old favorite. Try having a contest for the Strangest Burger, Most Boring Burger, Most Original, etc. Let me know how it goes!

Sunday, July 5, 2009

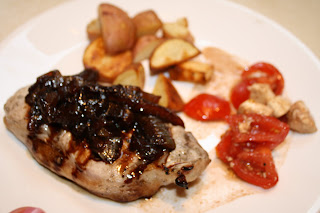
Brined Pork Chops

brined pork chops

We took the plunge. We invested in a new grill. By invested, I mean, paid twice what one would normally pay for a grill this size. We convinced ourselves that it will be worth it, and so far it has.
Of course we did the compulsory shopping first. Sears. Home Depot. Lowe's. Each grill was so poorly built (think: wiggly) and unappealling. Then we did it. We bought a Weber gas grill, the Genesis. I have to say, I'm glad we did. It's solid. It works so well. No more under-cooked meat on one side, over-cooked on the other. Sear marks everywhere!

One of the first meals I cooked on the grill were these pork chops. I adapted the recipe from Allrecipes. Wow, did they come out moist. I highly recommend taking the time to brine them -- well worth the hour. The balsamic onions also provide great flavor. Start your grills!


1 1/2 quarts water
5 tablespoons kosher salt
2 tablespoons white sugar
6 pork loin chops, 1/2 inch thick

1/4 cup olive oil
4 cloves garlic, minced
2 t. fresh rosemary, minced (or more to taste)

1 cup balsamic vinegar
1 tablespoon butter
1 tablespoon olive oil
2 Vidalia onions, each cut into 8 wedges
1 teaspoon salt

In a large storage bag placed in a large bowl, stir together the water, kosher salt, and sugar. Add pork chops to this brine, and let them soak for about an hour. Drain and discard the brine. Pat pork chops dry with paper towels.

In the same storage bag, stir together the olive oil, garlic, and rosemary. Place pork chops in bag, and turn to coat. Marinate in the refrigerator for at least 2 hours.

Pour the balsamic vinegar into a small saucepan. Bring to a boil, and cook until reduced by 1/2, about 5 to 10 minutes. Watch closely. I burned my first batch.

Melt butter with olive oil in a large skillet over medium-high or high heat. Add the onions and brown them, reduce heat to low, and cook for about 7 minutes, or until tender. Stir in the reduced vinegar and salt.

Preheat the grill for medium-high heat. Cook pork for about 4 minutes per side, or to desired doneness. Remove to a serving plate, cover with aluminum foil and let rest for a few minutes. Uncover, top with the onion sauce, and serve.